Whether it’s attending a tech conference in Tokyo or conducting on-site research and meetings across Hokkaido, there’s always one tedious task waiting for you right after a business trip: writing your trip report email.
While waiting at the boarding gate or riding the JR Rapid Airport express train back to Sapporo, have you ever felt that sinking feeling: “I logged all my trip notes into Google Sheets, but retyping this into a polished email for my boss and team is such a drag…”?
In this tutorial, we will explore Google Apps Script (GAS) and master GmailApp.createDraft()—the essential method for automatically generating email drafts in Gmail!
By reading trip data directly from a spreadsheet, you will be able to instantly save draft trip reports beautifully styled with HTML formatting, including bold highlights, section headers, and bulleted lists.
If you’re a beginner thinking, “Automatically sending emails right away feels scary—what if I send a mistake?”, creating drafts is the perfect safety-first stepping stone. Let’s dive in with real-world code and make email automation super simple!
1. What Is GmailApp.createDraft() in Google Apps Script?
At first glance, it might look like a spell from a fantasy book, but break the terms down and the logic is delightfully simple.
Breaking Down the Method Structure
As we learned in Chapter 2, GAS connects the “Target (Who)” and the “Command (What to do)” with a dot (.).
GmailApp.createDraft(recipient, subject, body, options)GmailApp: The core class in Google Apps Script that controls all Gmail operations. It signals to your script: “Hey, I want to use Gmail features now!”.createDraft(): The method sent toGmailApp. Just as the name says, it instructs Gmail: “Create a brand-new draft email!”
In short, you are telling Google Apps Script: “Please save a draft email in my Gmail with this recipient, subject line, and body!”
2. Why Create a Draft Instead of Sending the Email Immediately?
Google Apps Script provides another method, GmailApp.sendEmail(), which sends emails immediately (we’ll cover this in Chapter 32).
However, especially when you are just beginning workflow automation, starting with createDraft() is strongly recommended!
Here are three beginner-friendly reasons why this approach shines:
1. It Acts as a Safety Net Against Accidental Sends
When writing code, bugs and typos happen—whether it’s the wrong email address, an incorrect date, or a swapped budget number.
If you use sendEmail() right out of the gate, an incomplete or buggy report instantly lands in your manager’s or client’s inbox.
By saving it as a draft first, you establish a rock-solid workflow: Generate automatically with GAS ➡ Review and tweak with human eyes ➡ Hit “Send” manually with confidence.
2. It Works as a Live Visual Preview
When designing styled HTML emails, saving a draft lets you open Gmail and verify that colors, font sizes, tables, and line breaks render cleanly before your audience sees them.
3. It Lets You Add Personal, Human Touches
You can automate 90% of the structured reporting and then manually drop in a warm personal note right before sending—like, “By the way, Manager, I left the Hokkaido souvenirs we talked about in the office breakroom!”
3. Basic Syntax and Arguments of GmailApp.createDraft()
Let’s look at the standard syntax for createDraft().
GmailApp.createDraft(recipient, subject, body, options);Inside the parentheses, you pass up to four parameters (arguments) separated by commas (,):
| Argument Position | Parameter Name | Type | Description | Example |
| 1st Argument | recipient | String | Recipient email address | "manager@digitalwonderland.net" |
| 2nd Argument | subject | String | Email subject line | "[Trip Report] Tokyo Office Visit" |
| 3rd Argument | body | String | Plain text message body | "Here is my trip report..." |
| 4th Argument | options | Object | Advanced options (HTML body, CC, etc.) | { htmlBody: "<b>Details</b>" } |
Key Takeaway: Build HTML Emails Using the 4th Argument (options)
Text passed into the 3rd argument (body) is treated as unformatted plain text.
However, when you include an options object like { htmlBody: "HTML markup string" } in the 4th argument, you unlock the ability to generate drafts with bold text, accent colors, custom headings, and formatted layouts!
4. STEP 1: Preparation! Create the Business Trip Report Spreadsheet
Let’s set up our Google Sheet to store our business trip data.
Setup Steps
- Create a new Google Sheet in Google Drive and name the spreadsheet “Business Trip Report Tracker”.
- Rename the bottom sheet tab to “Trip List”.
- Enter headers in row 1 and your sample trip details in row 2 as follows:
| A | B | C | D | E | F | |
| 1 | Destination | Trip Date | Purpose | Summary & Outcomes | Impressions & Next Steps | Recipient Email |
| 2 | Tokyo Shinjuku Office | 2026/01/22 | DX Project Coordination | – Agreed on next system requirements definition – Conducted on-site user interviews |
Face-to-face discussions in Tokyo accelerated progress significantly. Moving to design phase next month. | manager@digitalwonderland.net |
Tip: For the “Recipient Email” (cell F2), enter your own Google account email address during testing so you can experiment safely!
5. STEP 2: [Practice 1] How to Create a Plain Text Report Draft
Let’s start by building a clean, plain text draft without HTML markup first.
1. Enter the GAS Code
In the spreadsheet menu, navigate to Extensions > Apps Script, remove any placeholder code in the editor, and paste the following script:
function createSimpleReportDraft() {
  // 1. Prepare recipient, subject, and body text
  var recipient = "manager@digitalwonderland.net"; // Change to your own email address
  var subject = "[Trip Report] Tokyo Shinjuku Office Visit (2026/01/22)";

  // \n represents a line break
  var body = "Dear Team,\n\n"
           + "I hope this email finds you well. Here is my trip report.\n\n"
           + "- Destination: Tokyo Shinjuku Office\n"
           + "- Date: 2026/01/22\n"
           + "- Purpose: DX Project Coordination\n\n"
           + "- Summary & Outcomes\n"
           + "- Agreed on next system requirements definition\n"
           + "- Conducted on-site user interviews\n\n"
           + "Best regards,";

  // 2. Execute command to create draft in Gmail!
  GmailApp.createDraft(recipient, subject, body);

  // 3. Execution confirmation log
  Logger.log("Trip report draft created successfully!");
}
2. Grant Gmail Permissions on First Run
Once the code is pasted, click the Save (disk icon) button, and then click Run.
You will see the “Authorization Required” dialog, just like we encountered back in Chapter 2.
Because your script is requesting access to Gmail, Google presents a security confirmation asking whether you approve access.
Authorization Steps (3 Quick Steps)
- Click Review permissions.
- Select your Google account.
- When the warning “Google hasn’t verified this app” appears, click Advanced on the bottom left ➡ click Go to Untitled project (unsafe) (or your script name) ➡ click Allow on the final prompt.
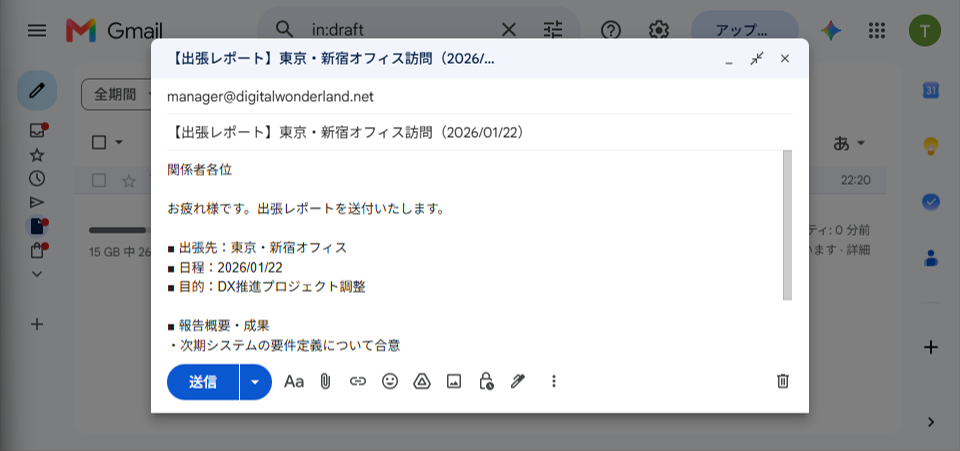
3. Check Your Gmail Drafts Folder!
Once authorized, wait until the GAS editor displays “Execution completed” at the bottom, then open your Gmail.
Navigate to your Drafts folder on the left menu…
You should see a neatly organized draft email with the subject “[Trip Report] Tokyo Shinjuku Office Visit (2026/01/22)”!
6. STEP 3: [Practice 2] How to Style a Trip Report Email Using HTML
Plain text emails are functional, but when reading long business reports, skimming for critical points can be difficult.
Now let’s elevate our communication by using standard HTML tags to add headers, clean bullet points, and bold text styling for a polished, executive-ready look!
Essential HTML Tags for Email Formatting
You don’t need extensive web design skills! These 5 basic tags are all you need for professional emails:
<h2>...</h2>: Section title / large header<b>...</b>or<strong>...</strong>: Bold text (emphasis)<br>: Line break (Note: Inside HTML strings, use<br>rather than\n)<ul><li>...</li></ul>: Bulleted list<hr>: Horizontal divider line
Writing the HTML Draft Code
Add the following function to your script editor and run it:
function createHtmlReportDraft() {
  var recipient = "manager@digitalwonderland.net"; // Change to your own email address
  var subject = "[Trip Report] Tokyo Shinjuku Office Visit (HTML Formatted)";

  // Fallback body for text-only clients or legacy mail readers
  var plainBody = "Dear Team, here is my trip report. Please view this message in an HTML-compatible email client.";

  // Well-structured HTML content
  var htmlContent = '<div style="font-family: sans-serif; color: #333; line-height: 1.6;">'
                  + '  <h2 style="color: #1a73e8; border-bottom: 2px solid #1a73e8; padding-bottom: 5px;">'
                  + '    ✈️ Business Trip Report'
                  + '  </h2>'
                  + '  <p>Dear Team,<br>I hope you are well. Here are the outcomes from today\'s business trip.</p>'
                  + '  '
                  + '  <table style="background-color: #f8f9fa; padding: 12px; width: 100%; border-radius: 5px;">'
                  + '    <tr><td><b>■ Destination:</b> Tokyo Shinjuku Office</td></tr>'
                  + '    <tr><td><b>■ Date:</b> January 22, 2026</td></tr>'
                  + '    <tr><td><b>■ Purpose:</b> DX Project Coordination</td></tr>'
                  + '  </table>'
                  + '  <br>'
                  + '  <h3 style="background-color: #e8f0fe; padding: 6px 10px; color: #1967d2;">1. Summary & Outcomes</h3>'
                  + '  <ul>'
                  + '    <li><b>System Requirements Agreement:</b> Aligned expectations across key stakeholders</li>'
                  + '    <li><b>User Interviews:</b> Identified 3 critical operational bottlenecks</li>'
                  + '  </ul>'
                  + '  <h3 style="background-color: #e8f0fe; padding: 6px 10px; color: #1967d2;">2. Impressions & Next Steps</h3>'
                  + '  <p>Face-to-face discussions in Tokyo accelerated our project timeline substantially.<br>'
                  + '  <b><span style="color: #d93025;">[Next Action]</span></b> Transitioning to Phase 2 (Design) on the 1st of next month.</p>'
                  + '  <hr>'
                  + '  <p style="font-size: 0.9em; color: #666;">*This email was automatically generated as a draft via Google Apps Script (GAS).</p>'
                  + '</div>';

  // Pass htmlBody in the 4th argument (options) to generate the draft!
  GmailApp.createDraft(
    recipient,
    subject,
    plainBody,
    {
      htmlBody: htmlContent
    }
  );

  Logger.log("HTML-formatted trip report draft created successfully!");
}
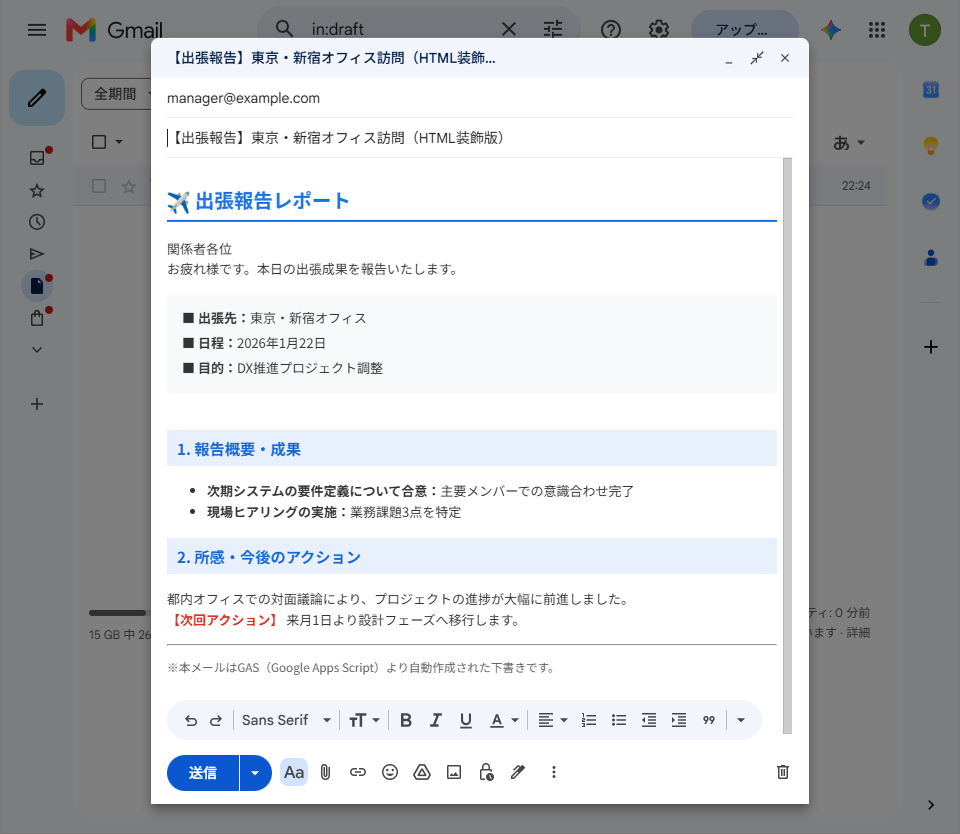
Reviewing the Output
Save your changes, execute createHtmlReportDraft, and head over to your Gmail Drafts folder.
Compared to the plain text version, you now have an eye-catching draft with crisp blue headings, a clean gray summary card, and bolded highlights that make the email effortless to read!
Your manager can immediately digest the core takeaways, and your communication radiates professionalism.
7. STEP 4: [Advanced] Dynamically Read Spreadsheet Data to Generate Drafts
Now for the grand finale!
Let’s combine skills from our previous articles—navigating sheets, reading cell values, and formatting dates—to build an automated workflow that reads real spreadsheet rows and generates a styled HTML email draft dynamically.
Key Methods We Are Reviewing
SpreadsheetApp.getActiveSpreadsheet().getActiveSheet()(Chapters 2 & 3): Accesses the currently active sheet.sheet.getRange(row, col).getValue()(Chapters 4 & 5): Retrieves data values from specified cells.Utilities.formatDate(date, timeZone, format)(Chapter 29): Converts a Date object into a readable date string like “2026/01/22”.
Full Automation Script
Paste the following code into your editor and try running it!
function createAutoReportDraftFromSheet() {
  // 1. Get spreadsheet and active sheet (Chapters 2 & 3)
  var ss = SpreadsheetApp.getActiveSpreadsheet();
  var sheet = ss.getActiveSheet();

  // 2. Fetch row 2 cell values directly (Chapters 4 & 5)
  var destination = sheet.getRange("A2").getValue(); // Destination
  var rawDate     = sheet.getRange("B2").getValue(); // Trip date (Date object)
  var purpose     = sheet.getRange("C2").getValue(); // Purpose
  var summary     = sheet.getRange("D2").getValue(); // Summary
  var impression  = sheet.getRange("E2").getValue(); // Impressions
  var recipient   = sheet.getRange("F2").getValue(); // Recipient address

  // 3. Format Date object to "yyyy/MM/dd" (Chapter 29)
  var formattedDate = Utilities.formatDate(new Date(rawDate), "Asia/Tokyo", "yyyy/MM/dd");

  // 4. Construct dynamic subject line
  var subject = "[Trip Report] " + destination + " (" + formattedDate + ")";

  // 5. Convert line breaks (\n) in cell data to HTML tags (<br>)
  // Using String.replace to swap newline characters for HTML tags
  var summaryHtml = String(summary).replace(/\n/g, "<br>");
  var impressionHtml = String(impression).replace(/\n/g, "<br>");

  // 6. Build HTML email body
  var htmlContent = '<div style="font-family: sans-serif; color: #333; line-height: 1.6;">'
                  + '  <h2 style="color: #1a73e8; border-bottom: 2px solid #1a73e8; padding-bottom: 5px;">'
                  + '    ✈️ Business Trip Report'
                  + '  </h2>'
                  + '  <p>Dear Team,<br>I hope you are well. Here are the outcomes from the recent business trip.</p>'
                  + '  '
                  + '  <table style="background-color: #f8f9fa; border-left: 4px solid #1a73e8; padding: 10px 15px; width: 100%;">'
                  + '    <tr><td><b>■ Destination:</b> ' + destination + '</td></tr>'
                  + '    <tr><td><b>■ Date:</b> ' + formattedDate + '</td></tr>'
                  + '    <tr><td><b>■ Purpose:</b> ' + purpose + '</td></tr>'
                  + '  </table>'
                  + '  <br>'
                  + '  <h3 style="background-color: #e8f0fe; padding: 6px 10px; color: #1967d2;">1. Summary & Outcomes</h3>'
                  + '  <p style="padding-left: 10px;">' + summaryHtml + '</p>'
                  + '  <h3 style="background-color: #e8f0fe; padding: 6px 10px; color: #1967d2;">2. Impressions & Next Steps</h3>'
                  + '  <p style="padding-left: 10px;">' + impressionHtml + '</p>'
                  + '  <hr>'
                  + '  <p style="font-size: 0.85em; color: #666;">*This email was automatically generated from spreadsheet records.</p>'
                  + '</div>';

  // 7. Plain text fallback body
  var plainBody = "Dear Team,\n\n"
                + "Here is my trip report.\n"
                + "- Destination: " + destination + "\n"
                + "- Date: " + formattedDate + "\n"
                + "- Purpose: " + purpose + "\n\n"
                + "For complete formatting, please open this message in an HTML-supported client.";

  // 8. Instruct Gmail to create the draft!
  GmailApp.createDraft(recipient, subject, plainBody, {
    htmlBody: htmlContent
  });

  Logger.log("Created trip report draft for \"" + destination + "\" from spreadsheet data!");
}
With this script, whenever you update rows in your spreadsheet, running your function instantly creates a flawless report draft ready for review in Gmail!
8. 5 Common Traps Beginners Face and How to Solve Them
Here are five frequent traps that developers encounter when working with GmailApp.createDraft() and HTML emails, along with how to troubleshoot them.
Trap 1: Forgetting Curly Brackets {} in the 4th Argument
This is the single most common syntax mistake:
// ✕ Incorrect syntax (missing object braces)
GmailApp.createDraft(recipient, subject, plainBody, htmlBody);

// ◯ Correct syntax (must be an object: { htmlBody: ... })
GmailApp.createDraft(recipient, subject, plainBody, { htmlBody: htmlContent });
The 4th argument requires an object literal in the form of { optionName: value }. Always enclose htmlBody in curly braces {}.
Trap 2: HTML Email Missing Line Breaks (Confusing <br> with \n)
If you enter multiline text inside a spreadsheet cell (using Alt + Enter or Option + Enter) and pass it straight to htmlBody, standard HTML will collapse all newlines into spaces, turning your paragraphs into a single continuous wall of text.
- Plain text newlines ➡
\n - HTML newlines ➡
<br>
The solution is the single line of code introduced in Step 4:
// Replace all cell line breaks (\n) with HTML line break tags (<br>)
var summaryHtml = String(summary).replace(/\n/g, "<br>");
This regex replacement ensures that multi-line cell entries keep their exact formatting in the resulting email draft.
Trap 3: Leaving the 3rd Argument (body) Completely Blank
You might think, “If I’m using an HTML body, I can just leave the 3rd argument as an empty string "", right?” Be careful with that shortcut.
Certain enterprise networks with strict spam or security filtering, as well as legacy email readers, will hide HTML content and display only the plain text fallback from the 3rd argument.
Always include a brief text note in the 3rd argument as a professional fallback measure.
Trap 4: Script Halting with an Invalid email: Error
If the execution terminates with Exception: Invalid email: manager@example.com, there is an issue with your recipient address formatting.
- Check for accidental leading or trailing spaces.
- Ensure symbols like
@are standard half-width characters. - Make sure the address is not an unpopulated placeholder.
Double-check cell F2 in your sheet to confirm the email is valid and clean.
Trap 5: Entire Loop Stops on a Single Bad Row
When looping through multiple rows of data to draft reports for several team members, a single mistyped email address will halt the entire execution.
In production, guard your draft creation using a try...catch block (introduced in Chapter 30) so failures log gracefully without interrupting the rest of the batch:
try {
  GmailApp.createDraft(recipient, subject, plainBody, { htmlBody: htmlContent });
} catch (e) {
  Logger.log("Draft creation failed: " + e.message);
}
9. Summary & What’s Next
In this chapter, we covered how to use GmailApp.createDraft() as our foundation for Gmail automation, generating styled business trip report drafts directly from spreadsheet data.
Key Takeaways from Today’s Lesson
GmailApp.createDraft()is a safe command that creates draft emails without immediate sending risk.- Passing
{ htmlBody: "..." }in the 4th argument unlocks styled HTML emails. - Combining
getValue()andUtilities.formatDate()creates fully automated dynamic drafts. - Always convert newline characters (
\n) to<br>tags when outputting cell text inside HTML.
By logging your notes into Google Sheets on the go, running your script, and finding a formatted draft waiting for your final thumbs-up in Gmail—you’ll wonder how you ever managed business trip follow-ups manually!
Coming Up Next
Now that you have draft creation down to a science, the next logical step is full hands-off automation!
In Chapter 32, we’ll dive into GmailApp.sendEmail(): Automatically Sending Styled HTML Trip Reports.
We will connect time-driven triggers to dispatch scheduled emails automatically and review best practices for error-free delivery. Stay tuned!