In the previous post (Episode #31), we learned how to read business trip data from Google Sheets and automatically create polished HTML drafts in Gmail using GmailApp.createDraft().
The workflow of “creating a draft first and doing a final manual check before sending” is both safe and super convenient. But as you get comfortable with it, have you ever felt like this?
- “This is a standardized routine report, so I’d love to send it to everyone involved with a single click—without opening drafts!”
- “I want to send it to my manager in the TO line, while CCing my team members and BCCing HR/General Affairs all at once!”
That is exactly why in this 32nd tutorial, we’re diving deep into an essential method that sends emails directly without saving a draft: GmailApp.sendEmail()!
Continuing with our “Business Trip Report” example from Episode #31, we will explore how to configure CC (Carbon Copy) and BCC (Blind Carbon Copy)—which we haven’t covered yet—along with key tips and best practices when sending emails directly in real-world workflows, tailored for beginners.
1. What Is GmailApp.sendEmail()?
GmailApp.sendEmail() is a method that allows Google Apps Script (GAS) to send emails directly via Gmail without manual intervention.
Key Differences Between createDraft() and sendEmail()
Last time’s createDraft() and this time’s sendEmail() share almost identical syntax and parameter structures.
Here is the summary of their differences:
| Method | Action | Email Destination | Main Use Cases & Benefits |
GmailApp.createDraft() |
Creates a draft | Gmail “Drafts” folder | When you want human visual inspection before sending, or when you want to attach files manually later. |
GmailApp.sendEmail() ★This post |
Sends the email directly | Recipient’s Inbox (and your Sent folder) | When you want full automation, or scheduled automatic broadcasts via time-driven triggers at night or specific hours. |
Because the basic argument structure and HTML configuration steps are identical to Episode #31, anyone who understood the last lesson will master sendEmail() in no time!
Basic Syntax of sendEmail()
sendEmail() is typically called by passing four parameters (arguments):
GmailApp.sendEmail(recipient, subject, body, options);recipient: A string specifying the primary recipient’s email address (TO).subject: A string specifying the subject line of the email.body: A string providing the plain-text fallback content.options: An object ({}) containing optional settings such as the HTML body, CC, BCC, and sender display name.
2. Mastering CC and BCC: How to Configure Options
Let’s look into how to specify CC and BCC, which are crucial for real-world business email communication and were not covered in Episode #31.
Quick Recap of CC vs. BCC
- TO: The primary recipient (e.g., the direct supervisor who needs to approve the report).
- CC (Carbon Copy): Secondary recipients to keep in the loop (e.g., colleagues or project members who traveled with you). All recipients can see these addresses.
- BCC (Blind Carbon Copy): Recipients kept in the loop discretely (e.g., the HR/General Affairs department tracking expenses, or a backup email for yourself). Other recipients cannot see these addresses.
Writing CC and BCC in GAS (The options Object)
To specify CC and BCC in GAS, provide them as key-value pairs inside the 4th argument, options.
var options = {
  // HTML formatted body
  htmlBody: htmlContent,
  // CC recipients (comma-separated for multiple addresses)
  cc: "tanaka@digitalwonderland.net, sapporo-dx@digitalwonderland.net",
  // BCC recipients (comma-separated for multiple addresses)
  bcc: "soumu@digitalwonderland.net",
  // Sender display name
  name: "Business Trip Reporting System"
};
Crucial Rule for Specifying Multiple Recipients!
When listing multiple email addresses in CC or BCC, combine them into a single string separated by half-width commas (,).
- ○ Correct:
"user1@example.com, user2@example.com" - ✕ Incorrect:
"user1@example.com; user2@example.com"(Semicolons are not allowed) - ✕ Incorrect:
"user1@example.com,user2@example.com"(Full-width commas cause errors)
3. STEP 1: Preparation! Setting Up the “Business Trip Report” Spreadsheet
Let’s prepare our Google Sheet from Episode #31 by adding columns for CC and BCC!
Steps
- Open the “Business Trip Report Management Sheet” (Sheet tab: “Trip List”) created in Episode #31.
- Extend row 1’s header by adding “Share (CC)” to Column G and “Admin (BCC)” to Column H.
- Enter email addresses in row 2 of Column G and H as shown below. You can also rename Column F’s header to “Recipient (TO)” for clarity.
| A | B | C | D | E | F | G | H | |
| 1 | Destination | Trip Dates | Purpose | Summary & Outcomes | Takeaways & Next Actions | Recipient (TO) | Share (CC) | Admin (BCC) |
| 2 | Tokyo / Shinjuku Office | 2026/01/22 | DX Project Coordination | – Agreed on requirements for next-gen system – Conducted on-site interviews |
In-person discussions at the Tokyo office accelerated progress significantly. Moving to the design phase next month. | manager@digitalwonderland.net | tanaka@digitalwonderland.net, sapporo-dx@digitalwonderland.net | soumu@digitalwonderland.net |
* When testing the script, please replace all addresses (TO, CC, BCC) with your own email address (or alias) to avoid accidentally sending test emails to colleagues!
4. STEP 2: Hands-on! Automatically Sending an HTML Email with CC and BCC
Once your spreadsheet is ready, let’s open the Apps Script editor and write the code.
1. Entering the Code
From the Google Sheets menu bar, navigate to Extensions > Apps Script and paste the following code into the script editor.
function sendAutoReportEmailFromSheet() {
  // 1. Get the spreadsheet and active sheet (Episodes #2 & #3)
  var ss = SpreadsheetApp.getActiveSpreadsheet();
  var sheet = ss.getActiveSheet();

  // 2. Fetch specific data from row 2 (Episodes #4 & #5)
  var destination = sheet.getRange("A2").getValue(); // Destination
  var rawDate     = sheet.getRange("B2").getValue(); // Trip date (Date object)
  var purpose     = sheet.getRange("C2").getValue(); // Purpose
  var summary     = sheet.getRange("D2").getValue(); // Report summary
  var impression  = sheet.getRange("E2").getValue(); // Takeaways
  var toAddress   = sheet.getRange("F2").getValue(); // Recipient (TO)
  var ccAddress   = sheet.getRange("G2").getValue(); // Share (CC) *Added
  var bccAddress  = sheet.getRange("H2").getValue(); // Admin (BCC) *Added

  // 3. Format the date cleanly into "yyyy/MM/dd" (Episode #29)
  var formattedDate = Utilities.formatDate(new Date(rawDate), "Asia/Tokyo", "yyyy/MM/dd");

  // 4. Build the dynamic email subject line
  var subject = "[Business Trip Report] " + destination + " (" + formattedDate + ")";

  // 5. Convert line breaks (\n) in summary and takeaways to HTML break tags (<br>)
  var summaryHtml = String(summary).replace(/\n/g, "<br>");
  var impressionHtml = String(impression).replace(/\n/g, "<br>");

  // 6. Build the HTML email body (Styled cleanly with CSS!)
  var htmlContent = '<div style="font-family: sans-serif; color: #333; line-height: 1.6;">'
                  + '  <h2 style="color: #1a73e8; border-bottom: 2px solid #1a73e8; padding-bottom: 5px;">'
                  + '    ✈️ Business Trip Report'
                  + '  </h2>'
                  + '  <p>Dear All,<br>Thank you for your hard work. Here is the report on the business trip outcomes.</p>'
                  + '  '
                  + '  <table style="background-color: #f8f9fa; border-left: 4px solid #1a73e8; padding: 10px 15px; width: 100%;">'
                  + '    <tr><td><b>■ Destination: </b>' + destination + '</td></tr>'
                  + '    <tr><td><b>■ Date: </b>' + formattedDate + '</td></tr>'
                  + '    <tr><td><b>■ Purpose: </b>' + purpose + '</td></tr>'
                  + '  </table>'
                  + '  <br>'
                  + '  <h3 style="background-color: #e8f0fe; padding: 6px 10px; color: #1967d2;">1. Summary & Outcomes</h3>'
                  + '  <p style="padding-left: 10px;">' + summaryHtml + '</p>'
                  + '  <h3 style="background-color: #e8f0fe; padding: 6px 10px; color: #1967d2;">2. Takeaways & Next Actions</h3>'
                  + '  <p style="padding-left: 10px;">' + impressionHtml + '</p>'
                  + '  <hr>'
                  + '  <p style="font-size: 0.85em; color: #666;">* This email was automatically generated and sent via Google Apps Script (GAS).</p>'
                  + '</div>';

  // 7. Create plain-text body fallback (For email clients that cannot display HTML)
  var plainBody = "Dear All,\n\n"
                + "Thank you for your hard work. Here is the business trip report.\n"
                + "■ Destination: " + destination + "\n"
                + "■ Date: " + formattedDate + "\n"
                + "■ Purpose: " + purpose + "\n\n"
                + "For details, please view this email in an HTML-compatible environment or refer to the attached materials.";

  // 8. Construct the options object (Setting CC, BCC, and HTML body)
  var options = {
    htmlBody: htmlContent,
    cc: ccAddress,
    bcc: bccAddress,
    name: "Business Trip Reporting System"
  };

  // 9. Send the email directly!
  GmailApp.sendEmail(toAddress, subject, plainBody, options);

  // 10. Log output and completion notice
  Logger.log("Successfully sent business trip report email to " + toAddress + "! (CC: " + ccAddress + ")");
}
2. Detailed Code Breakdown!
String(summary).replace(/\n/g, "<br>")- Line breaks entered in a spreadsheet cell (e.g., with “Alt + Enter”) are represented internally in JavaScript by the newline character
\n. - Because
\ndoes not render as a visible line break in HTML emails, we use.replace(/\n/g, "<br>")to convert them into HTML<br>tags.
- Line breaks entered in a spreadsheet cell (e.g., with “Alt + Enter”) are represented internally in JavaScript by the newline character
- Configuring the
optionsObject- By assigning
cc: ccAddressandbcc: bccAddress, the email is simultaneously dispatched to all the addresses listed in cells G2 and H2 of the sheet.
- By assigning
- Executing
GmailApp.sendEmail(...)- Arguments 1 through 3 pass the core information (TO recipient, subject line, plain-text body), while argument 4 passes the
optionsobject. This sends an email configured with HTML styling, CC, and BCC all at once!
- Arguments 1 through 3 pass the core information (TO recipient, subject line, plain-text body), while argument 4 passes the
3. Saving and Running for the First Time (Authorization)
- Click the Save icon (floppy disk) at the top of the editor.
- Ensure the selected function is
sendAutoReportEmailFromSheet, then click the Run button. - When running
GmailApp.sendEmail()for the first time, Google’s authorization popup will appear. (Follow the same approval steps as in Episode #2 and Episode #31: click “Advanced” > “Go to … (unsafe)” and allow permissions.)
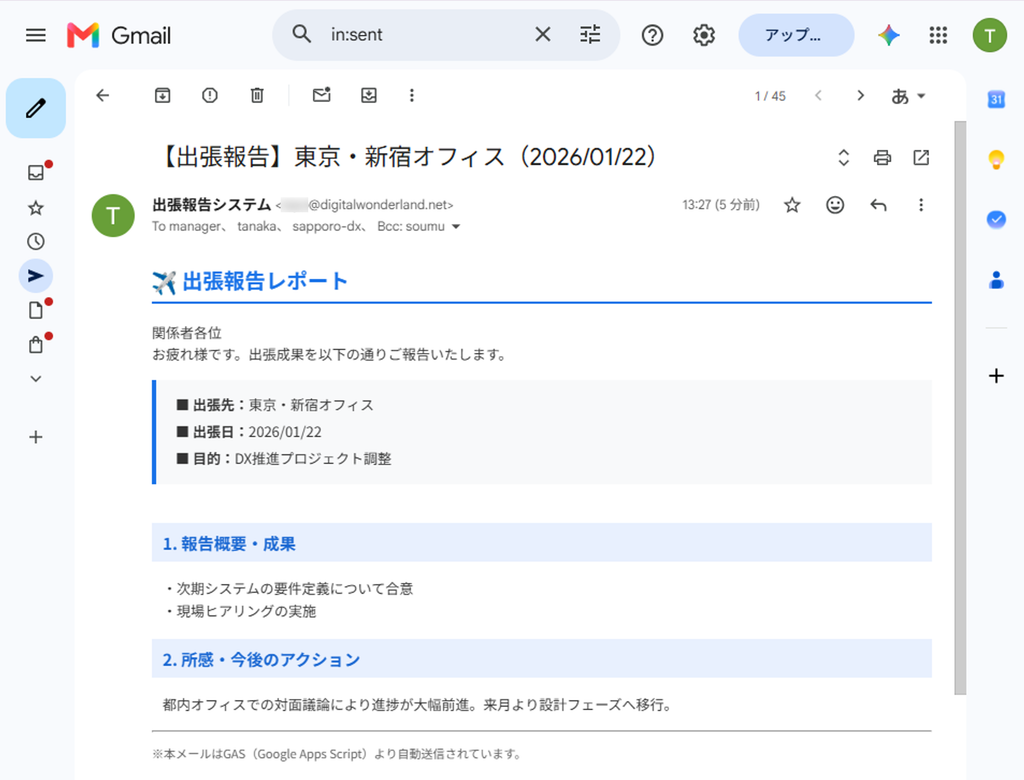
Once the execution finishes, open the recipient inbox!
If you see a stylish business trip report email decorated with blue accent headers and a clean table, with CC and BCC correctly populated, your script worked like a charm!
5. 4 Common Pitfalls for Beginners and How to Fix Them
When working with sendEmail(), beginners often encounter a few common stumbling blocks. Here are 4 essential traps and their troubleshooting fixes.
Pitfall 1: Accidentally Sending Test Emails to Real Recipients!
The moment you click Run with sendEmail(), the email is dispatched immediately to real recipients.
[Solution]
During development and testing, make it a habit to replace all TO / CC / BCC addresses with your own test email address, or use GmailApp.createDraft() learned in Episode #31 to verify output safely inside your Drafts folder first!
Pitfall 2: Using Semicolons or Full-width Commas in CC/BCC
Trying to send to multiple recipients can result in a TypeError or an “Invalid address” error.
[Cause & Solution]
Check if your separator is a semicolon (;) or a full-width character. You must separate addresses strictly with half-width commas (",").
To prevent input errors in Google Sheets from crashing your script, sanitizing the string in your code is a great defensive practice:
// Handy technique: automatically normalize semicolons and full-width commas to half-width commas
var cleanCc = ccAddress.replace(/;/g, ",").replace(/;/g, ",").replace(/,/g, ",");
Pitfall 3: Hitting Gmail Daily Sending Quotas
To protect against spam, Google places a daily quota on the number of emails you can send:
- Free Google Accounts (@gmail.com): Up to 100 emails/day
- Google Workspace Accounts (Paid): Up to 1,500 emails/day
* We’ll explore how to programmatically check your remaining email quota using MailApp.getRemainingDailyQuota() in Episode #39!
Pitfall 4: Leaving the 3rd Argument (body) as an Empty String "" When Using htmlBody
Sometimes developers write GmailApp.sendEmail(toAddress, subject, "", options), leaving the 3rd parameter blank because they provided an HTML body.
[Why is this bad?]
On smartwatches like the Apple Watch, or in corporate mail clients with strict security where HTML is disabled, the system displays the plain-text body (3rd argument) instead.
If you leave it empty, the recipient will see a completely blank email! Always provide a basic plain-text fallback summary.
6. Summary & What’s Next
In this post, we explored how to automatically send beautifully styled HTML business trip reports directly using GmailApp.sendEmail(), along with CC and BCC configuration.
Key Takeaways
GmailApp.sendEmail()dispatches emails directly without saving a draft.- Parameter structure is almost identical to
createDraft()from Episode #31 (your previous knowledge applies directly!). - CC and BCC belong inside the 4th argument (
options), and multiple addresses must be separated by half-width commas (","). - Always test with your own address to avoid accidental transmissions.
Now you have a complete system to read spreadsheet records, build HTML emails, and broadcast them to all stakeholders with one click!
Once you know how to send emails, the next logical step is learning how to automatically search, aggregate, and process received emails!
In Episode #33, we’ll dive into GmailApp.search()!
We will learn how to programmatically search through thousands of inbox emails and instantly extract only the ones matching specific search criteria. Stay tuned!