
In our previous articles (Parts 25 and 26), we kicked off the “UI (User Interface) Enhancement Phase” to interact directly with spreadsheet users. We explored how to display simple alert messages using Ui.alert() and gather single-line text inputs using Ui.prompt()!
With those built-in dialogs, your scripts can now ask “Are you sure you want to delete this?” or request “Please enter your name” right in the middle of an automated workflow.
However, as you build more practical tools for real-world office tasks, have you ever run into limitations like these?
- “I want to offer more options using dropdown menus or radio buttons!”
- “I want to include images and helpful descriptions to make a polished, user-friendly form!”
- “I need to collect multiple inputs (name, date, amount, etc.) all in a single screen!”
Standard methods like alert() and prompt() only support fixed, minimal layouts.
That is where Ui.showModalDialog() comes in! By combining Google Apps Script (GAS) with standard HTML and CSS, you can design and display completely customized modal popups directly inside Google Sheets.
In this guide, we’ll build a fun “Sapporo Soup Curry Takeout Order Form” for team lunch orders at our Sapporo office. You will learn everything from the basics of Ui.showModalDialog() and creating HTML files in the Apps Script editor to resizing windows and closing dialogs with custom buttons—all broken down step-by-step for absolute beginners!
1. What Is Ui.showModalDialog() in Google Apps Script?
Ui.showModalDialog() is a GAS method that displays a custom HTML popup window—known as a modal dialog—centered right over your active Google Spreadsheet.
What Does “Modal” Mean?
In programming and UI design, “modal” means that while this dialog is open, user interaction with the background spreadsheet is temporarily blocked.
In other words, users cannot click cells, edit sheets, or navigate menus until they either submit the form (e.g., clicking “Submit” or “OK”) or close the dialog (clicking “Close” or the “×” button).
This makes modal dialogs the perfect choice when you must prevent users from skipping required inputs or when confirming critical actions that shouldn’t be interrupted.
Comparing the 4 Custom UI Methods in GAS
Let’s compare the different UI features available in Google Apps Script, including what we’ve covered so far and what’s coming up next:
| Method | What It Displays | Customization | Background Interaction | Primary Use Case |
Ui.alert() [Part 25] | Message + standard buttons | ✕ (Fixed) | Blocked (Modal) | Quick notifications, simple confirmations |
Ui.prompt() [Part 26] | Single input field + buttons | ✕ (Fixed) | Blocked (Modal) | Entering a single string or number |
Ui.showModalDialog() ★ This Tutorial | Custom HTML/CSS window | ◯ (Fully customizable) | Blocked (Modal) | Multi-field forms, rich instructions, preview screens |
Ui.showSidebar() [Part 28] | Right-hand sidebar panel | ◯ (Fully customizable) | Allowed (Modeless) | Persistent utility panels, ongoing data entry assistants |
With Ui.showModalDialog(), you can style custom buttons with CSS, embed images, and build complex forms just like building a standard webpage!
2. Understanding the 3 Key Building Blocks of a GAS Modal Dialog
To render a modal dialog using Ui.showModalDialog(), your script follows a simple three-step flow:
[1. Prepare an HTML File]
  (Create the visual design and layout)
        ↓
[2. Load HTML with HtmlService]
  (Convert HTML into an "HtmlOutput" object that GAS can handle)
        ↓
[3. Display via Ui.showModalDialog()]
  (Pop up the rendered window in the Google Spreadsheet)
Using the “house and rooms” analogy we’ve referenced throughout this series:
SpreadsheetApp.getUi(): Call the spreadsheet’s “Front Desk / Concierge” (UI Manager) [Part 24].HtmlService.createHtmlOutputFromFile(): Hand the blueprint (HTML file) to the builder to construct a 3D room.ui.showModalDialog(): The concierge presents the completed room (dialog) right in the center of the house.
Now let’s walk through how to build one step by step!
3. STEP 1: Set Up the Spreadsheet and Create the HTML File
First, let’s prepare the spreadsheet and create our HTML template for the Sapporo Soup Curry order form.
1. Create a New Google Spreadsheet
- Open Google Sheets, create a new spreadsheet, and title it “Sapporo Soup Curry Orders”.
- From the top menu, navigate to Extensions > Apps Script to open the script editor.
2. Add an HTML File to the Project
Up until now, we’ve only worked with .gs script files. Now, we’re creating an HTML file inside the Apps Script project!
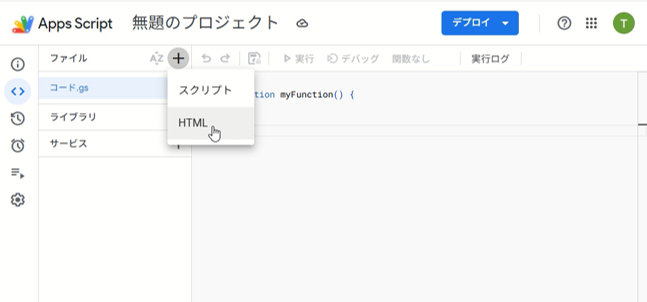
- On the left sidebar of the Apps Script editor, click the “+” (Add a file) button next to Files.
- Select HTML from the menu.
- When prompted for a file name, type
dialogand hit Enter (you do not need to type.html; GAS appends it automatically).
Once dialog.html appears in your file list, you are ready for the next step!
3. Add Design Code to dialog.html
Clear out any default code in dialog.html and paste the following HTML and CSS:
<!DOCTYPE html>
<html>
  <head>
    <base target="_top">
    <style>
      body {
        font-family: "Helvetica Neue", Arial, sans-serif;
        padding: 15px;
        color: #333;
        background-color: #fcf8f2;
      }
      h2 {
        color: #d35400;
        font-size: 18px;
        margin-top: 0;
        border-bottom: 2px solid #e67e22;
        padding-bottom: 5px;
      }
      .form-group {
        margin-bottom: 12px;
      }
      label {
        font-weight: bold;
        display: block;
        margin-bottom: 4px;
        font-size: 13px;
      }
      select, input[type="text"] {
        width: 100%;
        padding: 8px;
        border: 1px solid #ccc;
        border-radius: 4px;
        box-sizing: border-box;
      }
      .btn-container {
        margin-top: 20px;
        text-align: right;
      }
      button {
        background-color: #e67e22;
        color: white;
        border: none;
        padding: 8px 16px;
        border-radius: 4px;
        cursor: pointer;
        font-weight: bold;
      }
      button:hover {
        background-color: #d35400;
      }
    </style>
  </head>
  <body>
    <h2>🍛 Sapporo Soup Curry Takeout Order</h2>
    <p style="font-size: 12px; color: #666;">Please choose your lunch order for today.</p>

    <div class="form-group">
      <label for="name">Your Name:</label>
      <input type="text" id="name" placeholder="e.g., Taro Dosanko">
    </div>

    <div class="form-group">
      <label for="menu">Curry Variety:</label>
      <select id="menu">
        <option value="Chicken Vegetable">Tender Chicken & Vegetable Curry</option>
        <option value="Pork Belly">Slow-Braised Pork Belly Curry</option>
        <option value="Seafood">Fresh Seafood Soup Curry</option>
      </select>
    </div>

    <div class="form-group">
      <label for="spice">Spice Level:</label>
      <select id="spice">
        <option value="1">Level 1 (Mild)</option>
        <option value="3" selected>Level 3 (Medium - Recommended!)</option>
        <option value="5">Level 5 (Spicy)</option>
        <option value="10">Level 10 (Extra Spicy - Beware!)</option>
      </select>
    </div>

    <div class="btn-container">
      <button onclick="google.script.host.close()">Close</button>
    </div>
  </body>
</html>
Even if you are new to HTML, you can see how the labels, text inputs, and dropdown menus for name, curry selection, and spice levels are structured.
Notice the button at the bottom: <button onclick="google.script.host.close()">Close</button>. In Google Apps Script, google.script.host.close() is the standard client-side JavaScript method used to close a dialog window.
4. STEP 2: How to Open the HTML Dialog from GAS Code
Now that the HTML layout is ready, let’s write the Apps Script function in Code.gs that reads the HTML file and launches the popup modal dialog in your spreadsheet!
1. Add Code to Code.gs
Select Code.gs in the left file panel, clear any existing placeholder function, and paste the code below:
function openCurryOrderDialog() {
  // 1. Get the UI object (call the concierge)
  var ui = SpreadsheetApp.getUi();

  // 2. Create an HtmlOutput object from the HTML file (dialog.html)
  var htmlOutput = HtmlService.createHtmlOutputFromFile('dialog')
      .setWidth(400)   // Dialog width in pixels
      .setHeight(380); // Dialog height in pixels

  // 3. Display the modal dialog (specify title)
  ui.showModalDialog(htmlOutput, 'Sapporo Office Lunch Order Form');
}
2. Line-by-Line Code Breakdown
Though concise, this script contains several essential GAS concepts:
var ui = SpreadsheetApp.getUi();- As covered in Part 24, this retrieves the Spreadsheet UI environment so your script can interact with prompts, alerts, and custom menus.
HtmlService.createHtmlOutputFromFile('dialog')HtmlServiceis Google Apps Script’s dedicated service for serving HTML content.createHtmlOutputFromFile('dialog')parses thedialog.htmlfile you created.- Key Note: Pass only the file name prefix
'dialog'. Do not include.html.
.setWidth(400).setHeight(380)- Sets the width and height of the dialog window in pixels.
- If you omit this, Sheets displays the dialog at a default size (typically around 300×200 pixels), which may cut off your form content.
ui.showModalDialog(htmlOutput, 'Title')- The first argument is your configured
htmlOutputobject, and the second is the title string displayed in the dialog’s header bar. This renders the popup right in the center of the screen!
- The first argument is your configured
3. Save and Run the Script
- Click the Save (floppy disk) icon at the top of the editor.
- Ensure
openCurryOrderDialogis selected in the function dropdown, then click Run. - If this is your first time running it, Google will prompt you with an authorization review. Grant the requested permissions (see Part 2 for step-by-step guidance).
- Once execution finishes, switch over to your Google Spreadsheet tab!
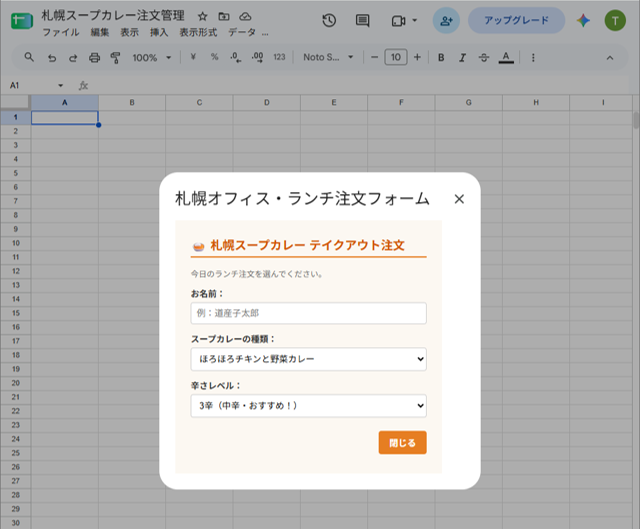
You should see your warm-toned soup curry order dialog beautifully displayed in the center of the sheet!
Try clicking on cells in the background sheet. You’ll notice they are non-interactive, confirming the dialog is strictly modal.
Clicking your custom “Close” button or the top-right “×” closes the dialog and restores regular spreadsheet access.
5. STEP 3: Advanced Customization Techniques for Ui.showModalDialog()
Here are two practical techniques to help you deploy dialogs like a pro in real-world workflows.
Technique 1: Inline HTML with createHtmlOutput() (No Separate File Needed)
If you only need a quick message with custom styling, you don’t necessarily have to create an external dialog.html file. You can pass raw HTML directly into HtmlService.createHtmlOutput():
function openSimpleDialog() {
  var ui = SpreadsheetApp.getUi();

  // Pass HTML markup directly as a string
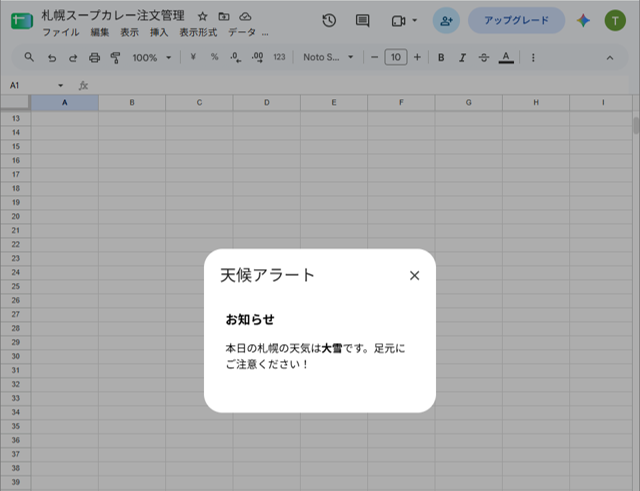
  var htmlString = '<h3>Notice</h3><p>Today\'s weather in Sapporo is <b>heavy snow</b>. Please watch your step!</p>';
  var htmlOutput = HtmlService.createHtmlOutput(htmlString)
      .setWidth(300)
      .setHeight(150);

  ui.showModalDialog(htmlOutput, 'Weather Alert');
}- When to use which method:
- Short announcements or formatted notices ➡
createHtmlOutput("HTML string") - Structured forms, CSS-heavy designs, or script-enabled components ➡
createHtmlOutputFromFile("fileName")
- Short announcements or formatted notices ➡
For readability and modular design, keeping your code in an external HTML file is generally the best practice!
Technique 2: Launch the Dialog with One Click via a Custom Menu
Your team members shouldn’t have to open the Apps Script editor just to trigger a dialog. Using the onOpen(e) simple trigger we covered in Part 21, let’s bind our dialog to a custom spreadsheet menu!
Add the following function to Code.gs:
// Runs automatically whenever the spreadsheet is opened
function onOpen() {
  var ui = SpreadsheetApp.getUi();

  // Add a custom "Soup Curry Club" menu to the top navigation bar
  ui.createMenu('Soup Curry Club')
    .addItem('Open Order Form', 'openCurryOrderDialog')
    .addToUi();
}
Refresh your spreadsheet, and you will see the new menu item “Soup Curry Club” > “Open Order Form” appear on the toolbar!
Now anyone can launch the customized order window with a single click—an essential technique when building tools for team collaboration.
6. 5 Common Pitfalls Beginners Face and How to Solve Them
Here are five troubleshooting tips for the most common errors developers encounter when working with Ui.showModalDialog().
Trap 1: Exception: No item with the given name could be found
Cause:
The file name provided to HtmlService.createHtmlOutputFromFile('dialog') contains a typo or points to a non-existent file.
Solution:
- If your file in the left panel is
dialog.html, pass exactly'dialog'(names are case-sensitive). - Do not write
'dialog.html'with the file extension, as this triggers an exception.
Trap 2: Dialog Content Gets Clipped with Scrollbars
Cause:
The pixel values defined in setWidth() or setHeight() are smaller than the rendered HTML body.
Solution:
Increase your dimensions with comfortable margins, such as setWidth(500) and setHeight(400), based on the actual height of your form elements.
Trap 3: The Custom Close Button Does Nothing
Cause:
A typo in google.script.host.close() inside your HTML button’s onclick handler, or missing JavaScript syntax.
Solution:
Ensure the handler is defined accurately as follows:
<button onclick="google.script.host.close()">Close</button>Trap 4: Passing a Raw String Directly to ui.showModalDialog
Cause:
Passing an HTML string directly into showModalDialog without converting it through HtmlService first.
// ✕ Incorrect syntax that causes an error
ui.showModalDialog("<h1>Hello</h1>", "Title");
Solution:
Always wrap raw HTML or file references with HtmlService.createHtmlOutput(...) or createHtmlOutputFromFile(...) to generate an official HtmlOutput object before calling the method.
Trap 5: Unable to Edit the Spreadsheet While the Dialog Is Visible
Cause:
This is expected behavior! As highlighted earlier, showModalDialog() is strictly modal, which deliberately locks background spreadsheet manipulation.
Solution:
If you need users to inspect or modify cells while keeping a custom panel open, use Ui.showSidebar() (Sidebars) instead, which we will explore in the next tutorial!
7. Summary and What’s Coming Next
In this tutorial, we covered how to build and display fully customized HTML popups in Google Sheets using Ui.showModalDialog()!
Key Takeaways
Ui.showModalDialog()displays custom HTML interfaces right inside Google Sheets.- It runs in a modal state, locking background cell interactions until dismissed.
- Create an HTML template and load it using
HtmlService.createHtmlOutputFromFile('fileName'). - Control your dialog viewport cleanly with
.setWidth()and.setHeight(). - Use
google.script.host.close()inside client-side HTML buttons to close dialogs smoothly.
Once you master custom dialogs, the user experience of your internal tools and business automations leaps to a truly professional level!
What’s Next?
Because modal dialogs monopolize the center of the screen, they are ideal for focused input tasks. However, they aren’t ideal when users need to cross-check sheet records while typing or keep a helper tool docked continuously.
In Part 28, we’ll dive into Ui.showSidebar(), which docks an interactive panel on the right side of the screen without interrupting normal sheet editing!
Sidebars are fantastic for continuous data entry assistants and complex internal management tools. Stay tuned!
