
When working in Google Sheets, have you ever thought, “I wish I had a handy control panel or input form pinned right beside my sheet while I edit cells”?
The dialog functions we covered previously—like Ui.alert(), Ui.prompt(), and Ui.showModalDialog()—prevent you from clicking or editing spreadsheet cells while the popup is active. To interact with your sheet again, you always had to close the dialog first.
That is where Ui.showSidebar() comes in! This powerful Google Apps Script method lets you dock a completely custom control panel directly on the right side of your Google Sheets window.
With sidebars, you can freely enter and edit spreadsheet data while clicking buttons on the right panel to trigger automated scripts, look up reference data, and more. It is the ultimate feature for turning Google Sheets into your own custom productivity tool.
In this tutorial, we will build a fun “Soup Curry Takeout Order Helper” for our Sapporo office team to walk through everything: the core mechanics of Ui.showSidebar(), how to connect HTML files to GAS, and the common pitfalls beginners face!
1. What Is Ui.showSidebar()?
Ui.showSidebar() is a Google Apps Script (GAS) command that displays an HTML-based custom panel docked to the right edge of your Google Sheets UI.
Modal Dialogs vs. Sidebars: Key Differences
When creating user interfaces in GAS, you mainly choose between “Dialogs” and “Sidebars.” Let’s compare their key differences in the table below.
| Feature | Modal Dialog (showModalDialog, etc.) | Sidebar (showSidebar) |
| Location | Center of the screen (popup modal) | Right side of the screen (docked panel) |
| Cell Interaction | Blocked (Sheet is locked until closed) | Fully interactive! (You can type and edit freely) |
| Width | Fully customizable size | Fixed width at 300px (Height adjusts automatically) |
| Best Use Cases | Urgent alerts, confirmations, mandatory inputs before proceeding | Interactive helper tools, reference guides, frequently used action buttons |
The biggest benefit of a sidebar is that it never interrupts your spreadsheet workflow.
You can multitask effortlessly—entering data into cells while using the sidebar on the right to search records, trigger calculations, or run automations.
How It Works: Role Division Between GAS and HTML
To display a custom sidebar, you need two files working together:
- GAS Script (
.gsfile): The controller that runs server-side logic and calls the command to display the sidebar. - HTML File (
.htmlfile): The blueprint that defines the sidebar’s structure, layout, styles, and buttons.
We achieve this by combining the Ui object introduced in Episode 25 (“SpreadsheetApp.getUi()”) with HtmlService, Google Apps Script’s built-in service for serving HTML.
2. STEP 1: Set Up the Spreadsheet and Create the HTML File
Let’s get ready to build our sidebar. First, we will create a new HTML file inside the Google Apps Script editor.
Step-by-Step Setup
- Open a new spreadsheetCreate a new Google Spreadsheet in your browser and title it “Sapporo Office – Soup Curry Order Management”.
- Open the Apps Script editorIn the top menu, navigate to Extensions > Apps Script.
- Create a new HTML fileIn the left sidebar of the script editor, click the + (Add a file) button (just above “Libraries”) and select HTML.
- Name your fileWhen prompted for a file name, enter
sidebarand press Enter. (This creates a file namedsidebar.html).
Now your project has both Code.gs and sidebar.html ready to go!
3. STEP 2: Hands-On! Write the Code to Display the Sidebar
With the files prepared, let’s add the required code to each file.
1. Build the UI in sidebar.html
Select sidebar.html from the file list on the left, delete any default boilerplate code, and paste the following HTML snippet:
<!DOCTYPE html>
<html>
  <head>
    <base target="_top">
    <style>
      body {
        font-family: 'Helvetica Neue', Arial, sans-serif;
        padding: 12px;
        background-color: #f9f9f9;
        color: #333;
      }
      h2 {
        color: #d9534f;
        font-size: 16px;
        border-bottom: 2px solid #d9534f;
        padding-bottom: 5px;
        margin-top: 0;
      }
      p {
        font-size: 12px;
        line-height: 1.5;
      }
      .card {
        background: #fff;
        border: 1px solid #ddd;
        border-radius: 6px;
        padding: 10px;
        margin-bottom: 10px;
      }
      .btn {
        display: block;
        width: 100%;
        padding: 8px;
        background-color: #d9534f;
        color: white;
        border: none;
        border-radius: 4px;
        font-weight: bold;
        cursor: pointer;
        text-align: center;
      }
      .btn:hover {
        background-color: #c9302c;
      }
    </style>
  </head>
  <body>
    <h2>Sapporo Soup Curry Order Helper</h2>
    <p>Select a cell in your sheet and check today's recommended menu!</p>

    <div class="card">
      <strong>Today's Recommendation</strong>
      <p>GARAKU (Odori)<br>Rich, flavorful broth infused with aromatic spices!</p>
    </div>

    <button class="btn" onclick="alert('Order button clicked!')">Update Order Note</button>
  </body>
</html>
2. Add Script Logic in Code.gs
Select Code.gs from the file list and paste the following Google Apps Script code:
function showMySidebar() {
  // 1. Create the HtmlOutput object from your HTML file
  var htmlOutput = HtmlService.createHtmlOutputFromFile('sidebar')
      .setTitle('Soup Curry Order Navigator'); // Sets the title in the sidebar header

  // 2. Retrieve the spreadsheet UI object (review from Episode 25)
  var ui = SpreadsheetApp.getUi();

  // 3. Execute the command to open the sidebar!
  ui.showSidebar(htmlOutput);
}
4. STEP 3: Code Breakdown & Execution
With just these few lines, you can display a polished sidebar right in Google Sheets. Let’s save and test it!
Running and Testing the Sidebar
- With
Code.gsopen, click the Save (disk icon) button in the toolbar, make sure the selected function isshowMySidebar, and click Run. - If this is your first time running the script, an “Authorization Required” dialog will pop up. Grant the requested permissions (feel free to review Episode 2 if you need a refresher on the authorization process).
- Switch back to your Google Sheets tab!
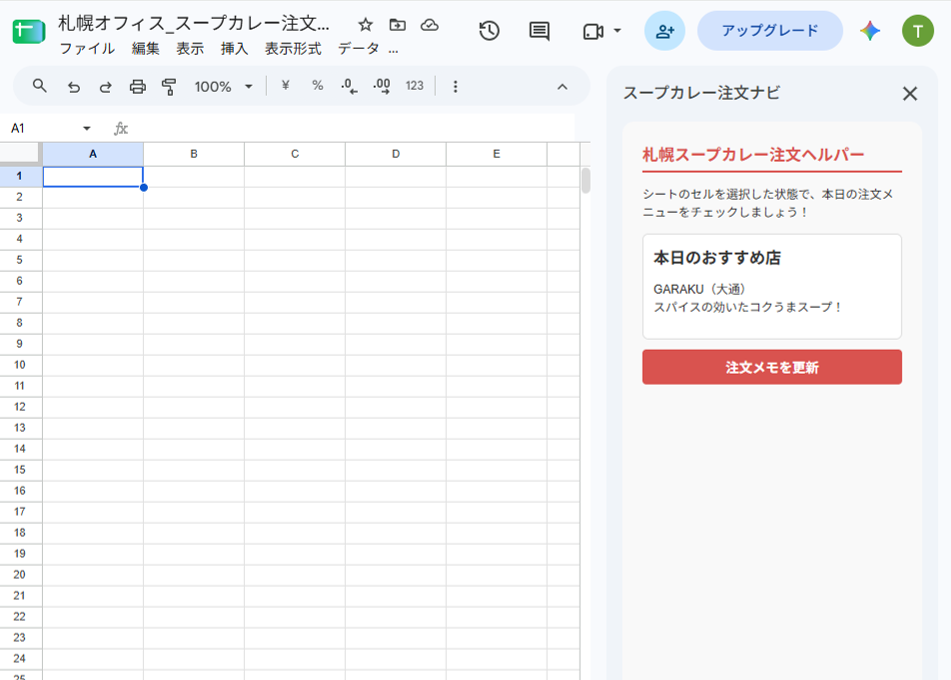
You should see a smooth sidebar slide in from the right edge showing the “Sapporo Soup Curry Order Helper” interface!
Try clicking around any cell in your spreadsheet while the sidebar is open. Unlike modal dialogs, you can select ranges, enter values, and edit cells without any hindrance.
Line-by-Line Breakdown of the GAS Script
Let’s dissect the core GAS methods making this work:
① HtmlService.createHtmlOutputFromFile('sidebar')
HtmlService is Google Apps Script’s built-in service for serving web pages and UI dialogs.
By calling .createHtmlOutputFromFile('sidebar'), GAS parses your sidebar.html file and converts it into a displayable HtmlOutput object.
*Note: You do not need to include the .html file extension in the parameter 'sidebar'.
② .setTitle('Soup Curry Order Navigator')
By chaining .setTitle() to the HtmlOutput object, you define the text rendered in the top header bar of the sidebar.
③ ui.showSidebar(htmlOutput)
This is the star of the show! We invoke .showSidebar() on the ui object retrieved via SpreadsheetApp.getUi() and pass in the htmlOutput created in step ①. This tells Google Sheets: “Render this HTML inside the right-hand panel!”
5. STEP 4: Level Up! Launch the Sidebar from a Custom Menu (onOpen)
Having to open the Apps Script editor and click “Run” every time you want the sidebar is not very practical for everyday use.
Let’s use what we learned in Episode 21 (“onOpen(e)”) and Episode 25 (“SpreadsheetApp.getUi()”) to create a custom top-level menu that launches our sidebar with a single click whenever the spreadsheet opens!
Update your Code.gs file with the following code:
// Built-in trigger that runs automatically when the spreadsheet opens (Episode 21)
function onOpen() {
  var ui = SpreadsheetApp.getUi();

  // Add a custom "★ Handy Tools" menu to the top bar (Episode 25)
  ui.createMenu('★ Handy Tools')
    .addItem('Open Soup Curry Sidebar', 'showMySidebar')
    .addToUi();
}

// Function to display the sidebar
function showMySidebar() {
  var htmlOutput = HtmlService.createHtmlOutputFromFile('sidebar')
      .setTitle('Soup Curry Order Navigator');

  SpreadsheetApp.getUi().showSidebar(htmlOutput);
}
Testing the Menu Integration
- Save your changes in the script editor.
- Reload the spreadsheet tab in your browser.
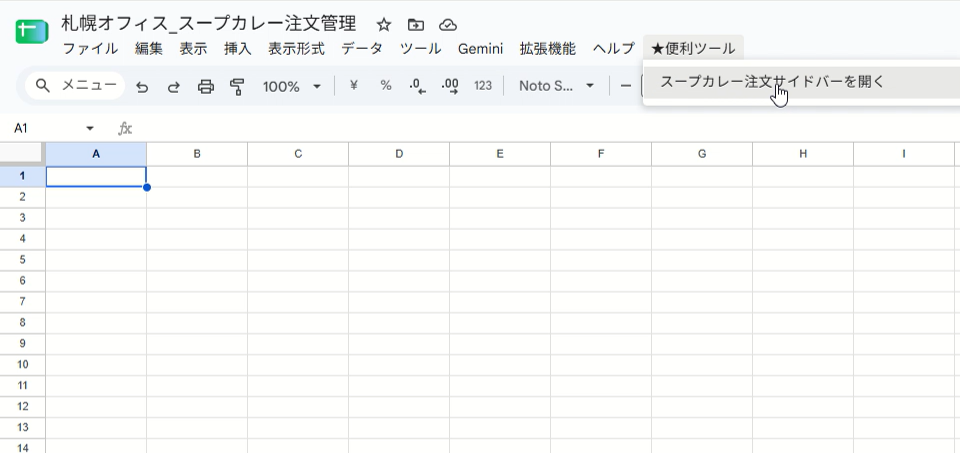
- Notice the new ★ Handy Tools menu in the Google Sheets toolbar.
- Click ★ Handy Tools > Open Soup Curry Sidebar, and watch your sidebar slide open effortlessly!
Now any coworker can take advantage of your custom tool without touching a single line of code.
6. 5 Common Traps for Beginners and How to Fix Them
When building UI components with Ui.showSidebar(), beginners often run into a few recurring stumbling blocks. Here is how to diagnose and resolve each one.
Trap 1: Exception: No item with the given name could be found
If this error appears in red during execution, it means there is a mismatch in the HTML file name.
// ✕ Incorrect example (file is named sidebar, but calling side_bar)
HtmlService.createHtmlOutputFromFile('side_bar')
[Solution]
Check that the file name in the left panel (e.g., sidebar) matches the string inside createHtmlOutputFromFile('...') exactly. File names are case-sensitive.
Trap 2: The Sidebar Width Won’t Change
While modal dialogs allow custom sizing via .setWidth(400), calling .setWidth() on a sidebar will have no effect.
[Technical Specification]
By Google Sheets design specifications, the sidebar width is permanently fixed at 300px. The vertical height dynamically spans 100% of the browser viewport.
When designing your sidebar layout, always style your CSS to fit cleanly within this 300px constraint.
Trap 3: HTML or CSS Edits Don’t Update on the Screen
Sometimes, after modifying text or styling in sidebar.html and saving, opening the sidebar still shows the outdated version.
[Solution]
This happens due to browser or GAS caching. Try the following quick fixes:
- Close the sidebar using the “x” button in the top-right corner, then reopen it from your custom menu.
- Do a hard reload of the Google Sheets page in your browser (F5 or Cmd+R).
Trap 4: Cannot read properties of null (reading 'showSidebar')
If you call SpreadsheetApp.getUi() from a standalone GAS project (one not attached directly to a Google Sheet), ui returns null, triggering an error.
[Solution]
As explained in Episode 2, always write your code inside a container-bound script created via Extensions > Apps Script directly within your spreadsheet.
Trap 5: Multiple Google Account Login Permission Errors
If you are signed into multiple Google accounts simultaneously within Chrome (such as a personal Gmail and a corporate Google Workspace account), the browser may block HTML rendering inside Apps Script sidebars.
[Solution]
Open the spreadsheet in an Incognito window, or use separate Chrome user profiles so that only a single Google account is signed in.
7. Summary & What’s Next
In this tutorial, we explored how to use Ui.showSidebar() to build custom docked panels that keep your spreadsheets fully interactive while running scripts.
Key Takeaways
Ui.showSidebar()displays a persistent custom panel on the right side of Google Sheets.- Unlike modal dialogs, sidebars allow users to freely edit and navigate sheet cells while open.
- You pair a script file (
.gs) with an interface template (.html) to generate the UI. - Load your interface using
HtmlService.createHtmlOutputFromFile('filename'). - Remember that sidebar width is strictly fixed at 300px.
Mastering sidebars elevates your spreadsheets from simple tabular sheets into powerful, internal web applications tailored specifically to your team’s workflow!
In this lesson, we focused on rendering the sidebar interface. To trigger server-side GAS functions directly from buttons inside your HTML sidebar, you will use google.script.run. We will dive deep into full web app and client-server integration in Phase 9 (starting with Episode 81), so stay tuned!
Next Episode Preview
In our next tutorial, we will conquer date manipulation: Episode 29: “Utilities.formatDate()”!
Have you ever retrieved a date in GAS only to get a messy string like Tue Sep 22 2026 20:30:00 GMT+0900? We will master the essential technique to cleanly format any date into readable patterns like “2026/09/22” or “September 22, 2026 8:30 PM” with ease. See you next time!
